
Read Data On The Fly

Background
Recently I’ve heard a lot of comments suggesting that Qlik Sense must be pre-loaded. Pre-loading has a lot of advantages for speed and reuse, but that doesn’t have to be the case. So, I published a video where I demonstrated the ability to browse a Snowflake catalog, choose tables, and then read the data on the fly into application. If that sounds cool, I then demonstrated the ability to create a new application that loaded the data from the selected tables. All with no QVD’s up my sleeves.
The goal of this post is to document the technical bits of how I was able to do those things. If you haven’t seen the video, feel free to watch now before digging in to all the details.
Target Audience
I don’t often identify who my posts are for, but for this one I would probably suggest that if you aren’t a technical programmer type, you stop here. The video let you know what is possible, and the rest of this post gets technical in terms of how to actually make it happen. I don’t want you to lose the magic, by getting overwhelmed with the technical implementation.
Partial Reload
The magic behind the “Ingest” button I had on the screen is the ability of Qlik Sense to do a Partial Reload. That means that all of the data you had previously loaded (full load) can stay in tact, while new data is added to your data model. First you need to call the IsPartialReload function. Then you check the result of calling the function and either do the code you wish to do for an initial “full load” or the code you wish to perform if it’s being called to do a “partial reload.” The basic structure in your load script would be as follows.
In my code the “full load” consisted of reading the data Snowflake Data Catalog to get a list of databases, schemas and tables. Then I simply presented those things in filter boxes just like you would any other data. Once I selected a table, an “Ingest” button was enabled. When I pressed the button, voila the system read the data on the fly for that table and it was part of my application. In Figure 1 I show you the properties for the button. First I go through a series of Setting Variables including setting a variable for the type of action I wish to take: “Add a Table” or “Clear the Tables.” Then I simply invoke the Action “Reload Data” and check the box indicating that I do not want to reload everything, I simply want to do a partial reload.
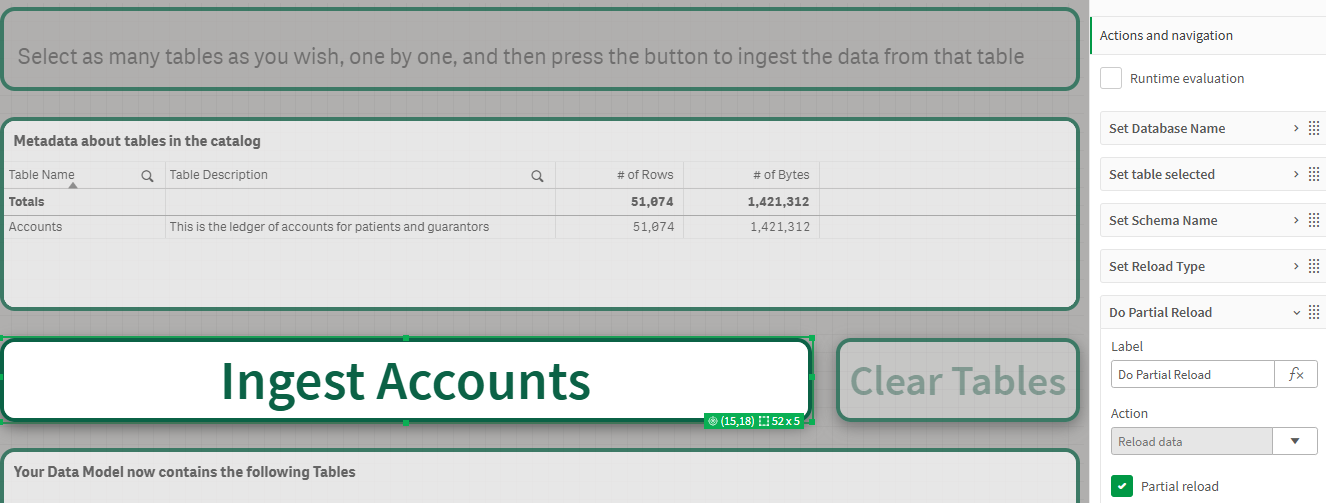
Figure 1: Ingest button properties panels showing Partial Reload action
In the “ELSE” section of my “IsPartialReload” condition of my load script I then check the “vReloadType” variable. If I pressed the Ingest button, then I simply setup the same type of code I would if I were pre-loading the data. In a previous video I produced that fully explains the partial reload functionality, I explained the concept of the load prefixes “Add” and “Replace.” Basically the “replace” says “if this table already exists in memory, replace it.” Using variables to read data on the fly from any location you wish. Now that’s cool.
Figure 2: Load script code for a Partial Reload
Clearing Tables
The intent of adding tables on the fly was to be able to rapidly prototype a solution and determine what data would be needed to answer business questions. Proving that Qlik Sense “can” read data on the fly is simply an exercise in what “can” be done. Being able to do rapid business intelligence prototype as I did in the video is what “should” be done to bridge the gap between IT and Business, or to allow end users a real self-service approach in which they didn’t even need to know how to load data. Clearing the tables was functionality that I added so that you could then start over and test a new scenario.
The Clear Tables button also invokes the partial reload script. But in the “else” condition for the “vReloadType” variable, instead of adding a new table, it clears the tables out of memory. Notice in Figure 2 that while looping through all of the in-memory tables backwards, I tell it not to delete 3 specific tables. The Databases, Tables and Tenants tables. You can probably guess that the Databases and Tables “tables” represent the data read from Snowflake. The Tenants table is the data read via a REST API that loads up the information about the SPACES available on the tenant. That information is needed when trying to create a new application as you will see in the next section.
Create a New Application
Reading the data on the fly probably caught your attention when you watched the video. But creating a new application on the fly, that then read all of the data in a more traditional approach probably kept your eyes glued to the monitor.
One of the key elements was being to identify the Space where the application should be stored. Hence that “Tenants” table that I loaded, and that I avoided not clearing out. Thus, the user is able to select the Space where they want to create the new application. The Application Name and Description are simply Input boxes for variables. So, let’s just jump right in to the “Create” button.
First the button action is set to “Execute Automation” and I selected a pre-built Qlik Application Automation. (Described later.) I checked the “Run mode: triggered” box which enables any/all users to have permissions to trigger “my” automation. Then I configured a bunch of parameters that simply contain a bunch of variable values. Tables is a concatenated list of all of the tables that were selected. The Library is a variable that contains the name of the Snowflake Connector to use to read the data from. The rest you can guess simply match selections and inputs from the screen.
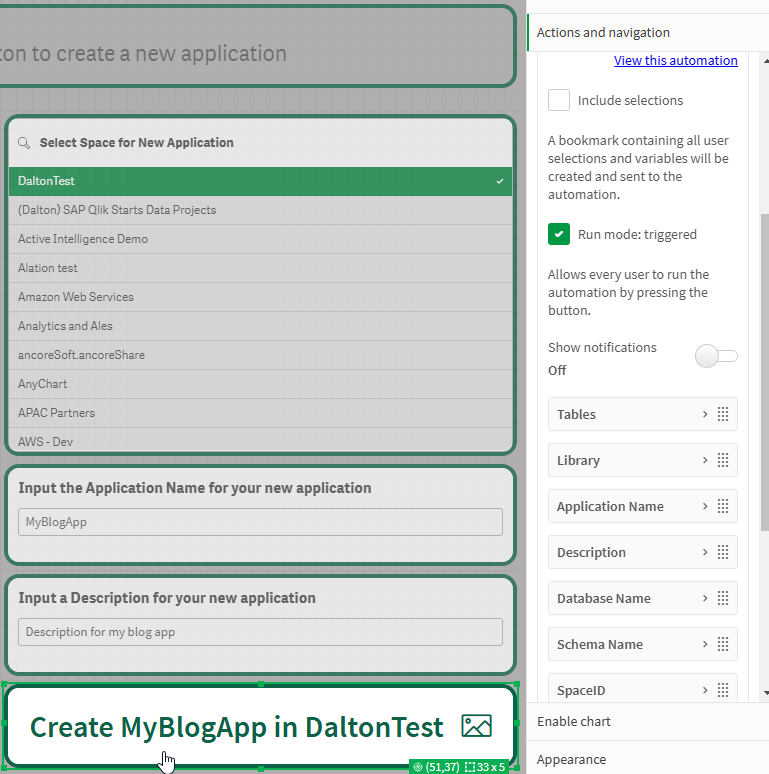
Figure 3: Create button properties
Parameters go t0 the Start Block
I’m about to unveil one of the least known things about Qlik Application Automations. Any parameters that are passed automatically go to the Start block of the automation, and you don’t need any type of Input block. They are passed just like you would pass a “body” to any other API.
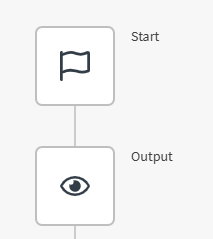
Figure 4: Image of Start Block with an Output Block
For debugging purposes, I tend to always follow my Start block with an Output block so that I can see what parameter names I passed in, and how the values come across. You would be surprised how many times this Dork has typos, or I actually pass the wrong variable. In Figure 5, you can see the output history from one run.
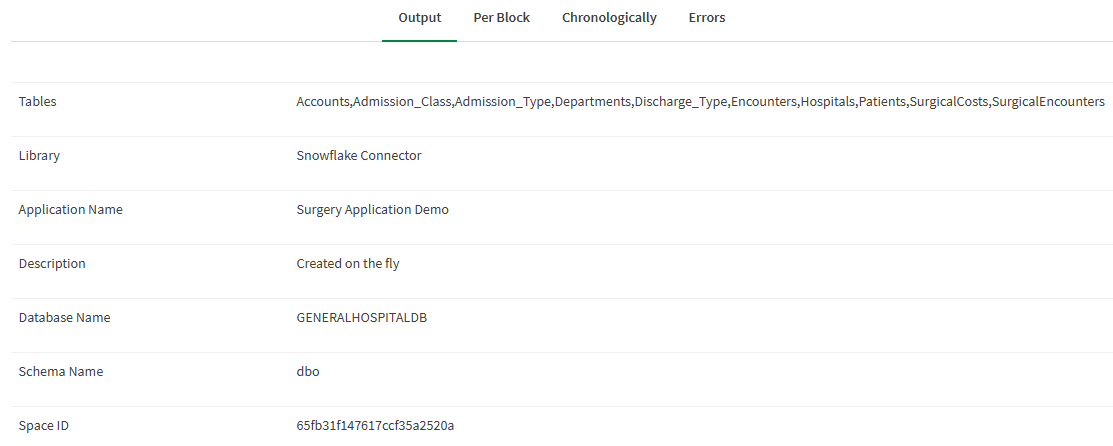
Figure 5: Output block showing all of the passed in parameters
Once you know about the fact you can pass parameters, the rest becomes easy. You simply refer to them in the same way you refer to anything else in Qlik Application Automations.
vScript
The center of attention for my Qlik Application Automation is simply a variable named “vScript.” Why?
Well as you will see the rest of the process really just involves standard automation blocks, like Create Application, Save Application and Do Reload. As you know an application without a load script is useless, and that’s what this vScript variable will contain. The script we want that new application to have.
In Figure 6 you can see that the first thing we want to have in our load script is the Library Connection that will be used to load the data. Notice that I hard code the text “LIB CONNECT TO” but the library name itself comes from the Start blocks, Library parameter that gets passed in. Another thing to take note of is that Qlik Application Automation provides a handy dandy function you can refer to called “linebreak” that inserts a line break so our text won’t all run together.
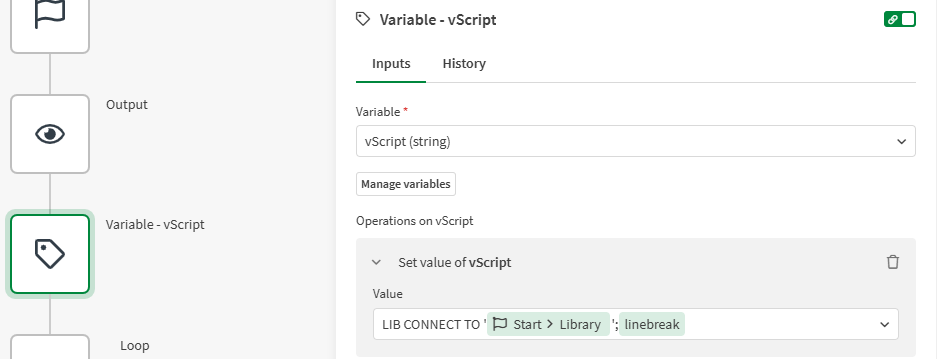
Figure 6: Beginning of the vScript variable
Looping through the Tables
If you notice in Figure 5, my Qlik Sense application sends all of the tables as a concatenated list like: “Table1,Table2,Table3.” That’s because the expression behind the “Tables” parameters is simply the Qlik Sense Concat function: =Concat([Table Name], ‘,’)
Well we need to load each table separately in our load script (vScript) and that process begins by using a “Loop” block, that iterates through the “list” that I “explode” out of the Start.Tables string.
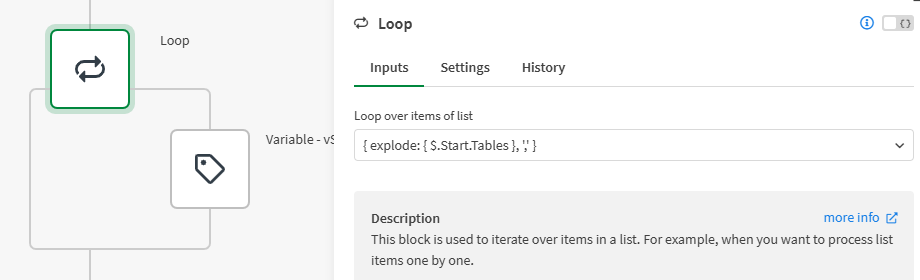
Figure 7: Loop block with explode table list
Before you panic … you DO NOT HAVE TO TYPE expressions like that in Qlik Application Automation. That string was created for me. When the item is blank I chose “Add Formula” and then used a Wizard as shown in Figure 8. Keep that in mind as you see other figures as well. I simply chose to show some of the values in their “raw” form so you could see how everything refers to the parameters from the start block.
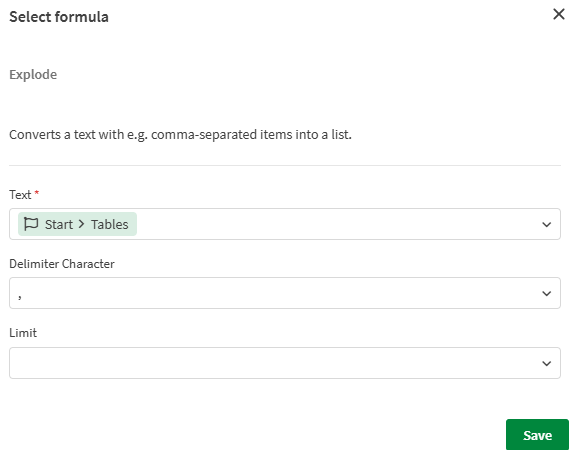
Figure 8: Wizard to build the explode command from the Start.Tables string
Adding Select Commands
You are already familiar with the fact that in your hand input load scripts you say “Table: Load …. Table Load … etc.” In Figure 9 you can see that same pattern. We append a “linebreak” each time through the loop. Then we append the table name that we are currently looping on. Then we simply do “SQL Select * From” before each table. Notice that we definitely want the fully qualified path of “Database.Schema.TableName” and that we surround each of the values with double quotes, just like we would type in Snowflake. Then we simply end each table in the loop with a “linebreak.”
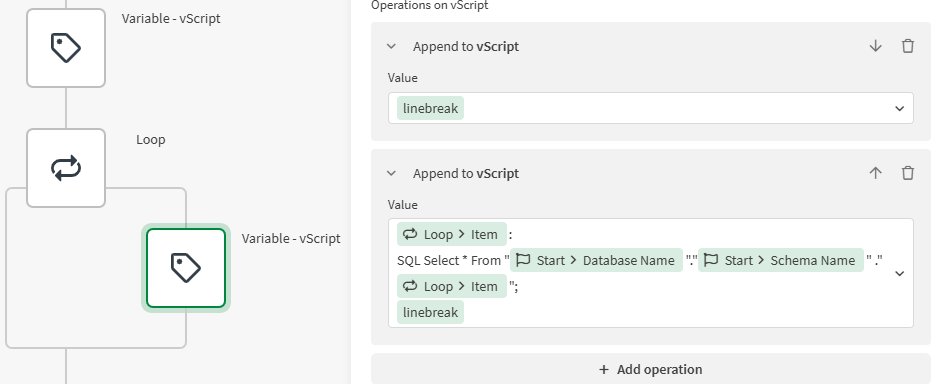
Figure 9: Appending table names 1 by 1 to our vScript variable
Metadata
If I’ve said “Metadata” once this year, I’ve said “Metadata” a thousand times this year. In fact I even wrote an entire post called “The Importance of Metadata.” Not only did I hammer home the importance of Metadata, I demonstrated how to build it in to your Qlik Scripts so that Table/Field descriptions could be seen to ensure trust in the data.
So, while it is an extra step, I felt it was important enough to show you how easily you could take take care of it. Even in a situation like this where you are building an application on the fly. We simply append another linebreak to our vScript variable, then we create a mapping load called “TableMap.” The “TableMap” is populated with the Table Names and Comments for them from Snowflake. We add another linebreak and then simply follow the format “Comment Tables using TableMap” that adds the comments to the tables. Plus it’s a bonus win: Not only do you read data on the fly, you read the metadata about the data on the fly.
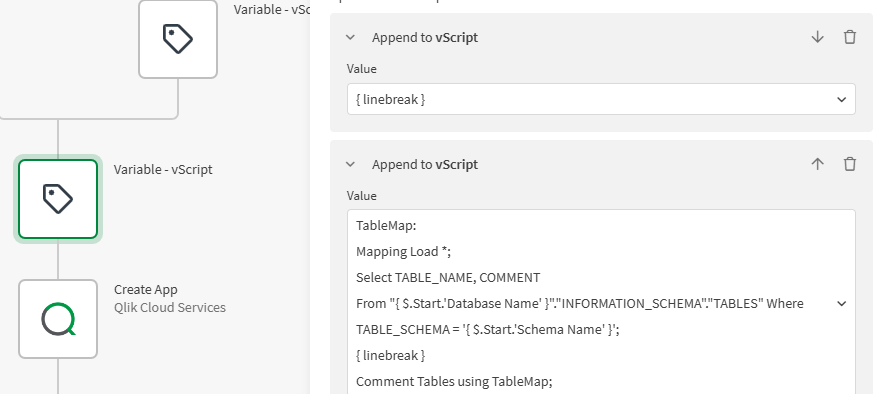
Figure 10: We have to append a TableMap to our script that will load the metadata from Snowflake
Create the Application
Feel free take a nice deep breath, stand, and relax your brain. Because believe it or not, the hardest part of this post is over. The next several steps are very easy to understand.
While it may seem difficult, creating an application is actually easy. You simply drag/drop the “Create App” block and fill in the simple inputs for Application Name, Application Description and Space ID. Best part … they were all passed in to the Start. Gotta love that.
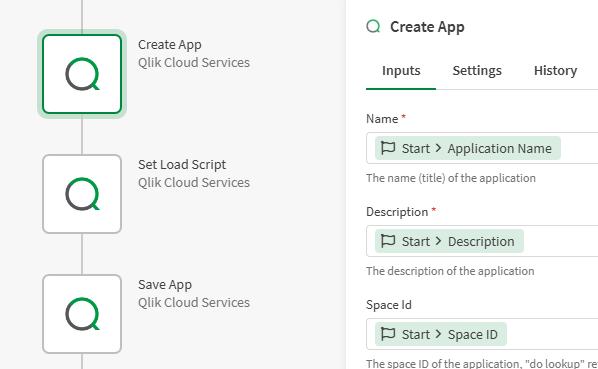
Figure 11: Create Application block in Qlik Application Automation
When this block is invoked when you trigger the automation from the button in the Qlik Sense Application … boom a “brand new” application is created with the name and description you supplied in the Space ID that you supplied. Why did I call out “brand new” the way I did? Because I wanted to call out that there is another option for you to create an application, other than creating a “brand new” one. You could also Copy an Application instead. Pause on that for a second and think through “why” it might be beneficial to copy an application, rather than create a brand new one.
Many organizations like to start with “template applications.” Perhaps the template application script file has INCLUDE scripts that bring in a bunch of variables, or subroutines that are commonly used. Maybe the template application has a company logo that should be as a header, and color style properties setup. What if it has sheets already established for things like “Help me” “Dashboard” “Trends” “Details.” Albeit they wouldn’t have any data values they could follow a design pattern that your organization desires. Interesting to think through the possibilities. I would love to hear comments from any of you reading who are in that situation and the light goes on for you.
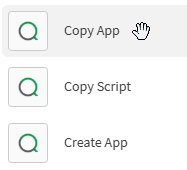
Figure 12: Alternative to creating a brand new application is to Copy an Application
Setting the Load Script
While establishing our “vScript” variable may well have been difficult to follow if you haven’t done much with Qlik Application Automation in the past, setting the script for our newly created application is easy. The Application ID is simply set to the ID returned by the Create (or Copy) Application block. If it is a “brand new” application, you simply set the script to the variable we have created and appended to.
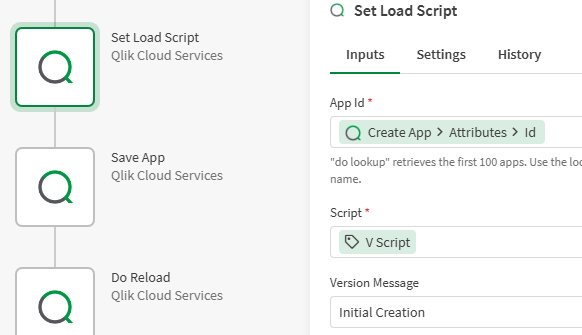
Figure 13: Set Load Script block takes an Application ID and the Script you want it to use
If you do like the idea of “Copy Application” then you would want to first use the “Get Script” block and start our vScript variable with the contents of the copied application. Then keep appending all of the work we did.
Saving the Application
I told you earlier to relax and breath again, that it was getting much easier. All we have to do now is use the “Save App” block and give it the ID of our newly created application that has our newly created (or appended) script in it.
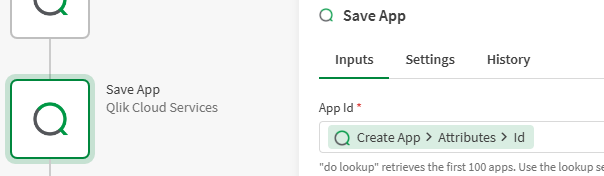
Figure 14: Save Application block is super easy and only takes an Application ID
To Reload or Not Reload, that is the Question
At this point reloading the application is simply a matter of choice. For the sake of my video I certainly wanted to add a wow factor and have the opportunity to simply open our newly created application and start working. Seeing the METADATA already loaded for the data model view was kind of cool. But it is just a matter of preference. You may prefer to simply created the application, add the script for it, save it and be done. Then you can manipulate the script as desired before you ever actually load data.
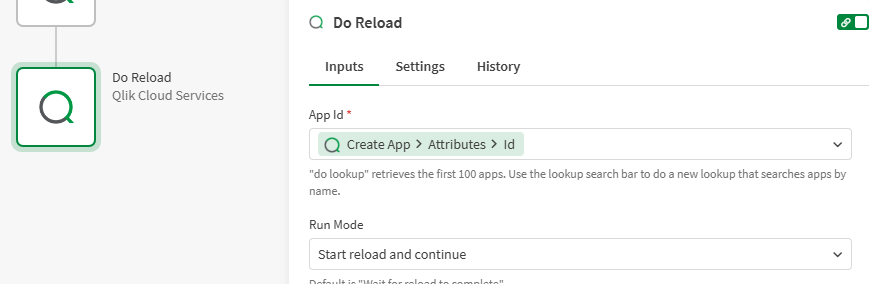
Figure 15: Do Reload block allows you to reload the data for your newly created application so it’s ready to go when you open it.
Summary
Hopefully this journey was a fruitful one for you. Both in terms of your understand of just how flexible you can get with your Qlik Sense environment, and in terms of your technical understanding of how to implement it should you desire to. If nothing else, keep the link to this post or the video handy so when someone tells you “Qlik has to pre-load data using QVD files and we need to read data on the fly”, you can send it to them. Do a mic drop. And go grab lunch early with a smile on your face.
Bonus Points
If I did my Qlik Dork “thing” right, then this will seem like it’s absolutely something you can do. Perhaps even too easy, and you will feel guilty for allowing your end users to read data on the fly, but not using your own magical coding chops. Don’t worry I have a little challenge for you to kick things up a notch. You probably noticed that in my example I simply used “Select * From Table” as the pattern to iterate through all of the tables. For the Metadata I simply added Table Descriptions and not field Metadata. Clearly not what you would want to do in the real world. Right?
So, feel free to utilize my example to simply get started … and then try and add in the ability to list the columns for each table just the way that would be done if you used the Select in the Load Script from a connector. “Load Field1, Field2, Field3; Select Field1, Field2, Field3 from Table” kind of thing. Hint: The Snowflake Describe Table query is what you will mostly like want to use. Something like:
Describe Table “GENERALHOSPITALDB”.”dbo” .”Accounts”
You could use that in the way I pulled the table comments to create a mapping load for the field comments as well.
You can execute that command with the Snowflake “Do Query” block inside of your automation if you want so that you can have a list of fields to loop over so instead of Select *, you can load the field list. If you do this, I would recommend that you have 2 variables: vLoad and vSelect, so that for each field you can simply append accordingly.
Look at you out there getting ready to complete this bonus activity, to read Snowflake data and metadata on the fly. You go with your bad self.
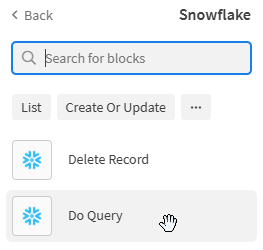
Figure 16: Do Query block can be used to fire a command to Snowflake and get a list of the fields for any table.
Hello, that’s great I’ll test that soon.
Thanks a lot for the sharing