
Qlik Sense REST API using OAuth (ServiceNow Implementation example)

Basic Auth to OAuth
Many vendors, including ServiceNow, enable more refined security than a simple basic user name and password, called OAuth. OAuth just stands for Open Authorization, which is simply an industry standard for requesting a token that has permissions to do something for a set amount of time.
What’s the big deal? If you provide your basic user credentials, Qlik can then go read the data you are saying to read and your boss is screaming to get it done. If you go through the hoops of creating client credentials and call an API within the other software and get a token back, Qlik can then read that same data.
Isn’t that the same thing? Why is your security team insisting on this?
At first glance when you just want to read data, and your boss is on your back then yes it can seem the same, and you may be upset you have to go through extra hoops to read data. More than likely it’s not just the extra hoop, it’s the fact that it’s a hoop you aren’t familiar with how to resolve.
So, let’s think about security a different way … one that impacts you more personally before I help you realize just how easy the “extra hoop” is to accomplish.
Your House
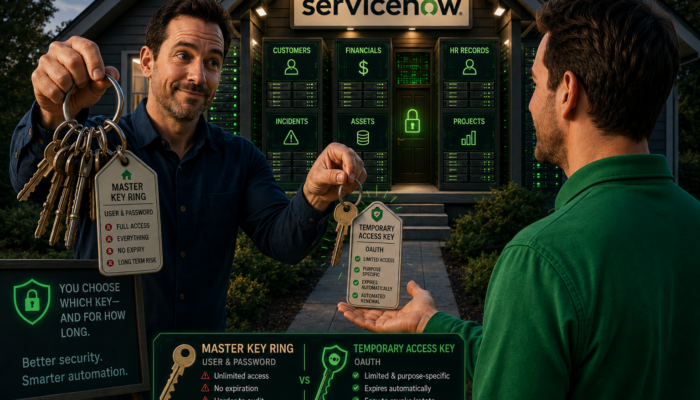
Let’s say you need someone to water the plants in your backyard while you are away. You trust them to water your plants, but you don’t necessarily have enough background to trust them with the contents of the safe in your home. You have the option to give them your entire key ring, that has the key to the gate, plus the key to your house, key to the garage, key to your safe. I mean, that’s the easiest the whole key ring is in your hand right now. Or you can take a few seconds and pull off the key to your gate and give them only that much access.
Not so far fetched an example because I’m guessing when you take your car to a mechanic you do exactly that. You take the time to pull off only the key to the car, because that’s all they need access to. Right?
When you give them the key to just they need access to in your mind there is an expectation that when you return you will get that key back and that they will no longer have access to your prized garden, or your prized car.
Wouldn’t it provide you even more peace of mind to give them the key to the gate, or your car, and have the key expire in a set period of time? So, that if you are in a hurry and forget to get it back you are assured they no longer have even that access.
OAuth security is very much like that. Not only can it issue keys to specific data resources, it can enable that key to only work for a set period of time.
Your security team isn’t punishing you. They are simply saying “We aren’t trying to keep you from reading data with Qlik. It’s your data, and you should have Qlik read it. We are simply asking you to only give Qlik the access it needs for the appropriate amount of time it needs it.”
Client ID and Client Secret
Vendors that support OAuth will provide some method of allowing you to get a Client ID and a Client Secret issued to you. The rest of this post is about how to implement OAuth specifically for ServiceNow, only as an example. The same thing applies to any software you might be using.
Your security will most likely be the ones issuing you a Client ID and Client Secret, I will go ahead and document some screen shots so that you understand the process. The more you understand how it works, and the why behind it, the friendlier and more understanding you can be with those security folks that right now you think are blocking you from getting what you need fast while your boss is screaming in your ear.
Step 1 – Create a Service Account User
Note: Screenshots are for illustration purposes only and may not match your version of ServiceNow.
-
- Navigate to User Administration > Users > New
- Give it a clear, unmistakable name — something like ‘svc.qlik.restusage‘
- Find the Identity Type field on the form (add it via Configure Form Layout if it’s not already visible) and set it to Machine
- On Zurich+, this automatically sets “Web service access only” — that checkbox is read-only by design now, driven entirely by Identity Type
- On pre-Zurich releases, you’ll set “Web service access only” directly instead, since Identity Type doesn’t exist yet
- Leave Internal Integration User unchecked — that flag is for instance-to-instance integrations, not this
- Assign only the roles this integration actually needs (just tell your security person what you are going to be doing, and they will translate for you into your product)
- Press Save

Step 2: Create the OAuth Application Registry (Client Credentials grant)
-
- Navigate to System OAuth
- Select Inbound Integration Experience > New Integration
- Choose the template: OAuth – Client Credentials grant
- Name it something descriptive — e.g. `Qlik Rest API Usage`
- In OAuth Application User pick the Qlik Rest Usage Service Account created in step 1.
- Leave Client ID and Client Secret blank — ServiceNow auto-generates both on save
- Set the Auth scope appropriately. In my example I’ve given it table_read to 2 different API’s. Just as an illustration.
- Scope Validation – Your security officer will know how to set this appropriately.
- Under Advanced options, leave Enforce token restriction unchecked — this lets the token fall back to whatever the linked service account’s roles/ACLs permit.
- Set the Token Format to Opaque

Step 3: Set the Access token lifespan (seconds) *
The Client ID/Secret they issue to you will remain active forever. Kind of like your user name and password. However, again the client has limited abilities. Those credentials will be exchanged at a secret window for a token. The “token” is like the limited timespan key in my analogy. How long the key/token is valid depends on the value in this parameter.
 Choosing the value is really up to you and your security team. They might say “Hey when a token is issued for this client id/secret it will only have access to read a handful of tables, so we have no problem allowing that token being used for 100 years. More than likely they might say, we only want the token to remain active for a single year/month/day/hour and then we want to ensure that Qlik renews it again. If they aren’t the 100 year type folks, I don’t blame them, it’s likely that they say “Hey next week we might want to limit the scope a little more.” But if the token was created for lots of access, you continue with that abundant access for 100 years.
We will get to the mechanism for exchanging the client/secret for one of these tokens in minute. But depending on the time you have some options. If they are happy to let you use the same token for 100 years you can simply do the exchange 1 time, and simply copy the token value and save it somehow. The process is identical if they want you to continually refresh it. But I will go through that as well. Take heart though, Qlik has you covered either way.
Step 4: Copy the Client ID and Client Secret
-
- Click the lock icon next to Client Secret to reveal it, and copy both values. This is your one clean look at the secret in most configurations — treat it accordingly.
- Press Save
Create a Qlik Rest Connection to make the OAuth Exchange

Create a new REST connection
-
- Set the URL to ‘https://<your tenant>.service-now.com/oauth_token.do‘
- Set the Method to POST
- After you set the Method to Post the Request Body box will appear. Set the body to the following: ‘grant_type=client_credentials&client_id=<your client id>&client_secret=<your client secret>‘
- Leave the Authentication Schema as Anonymous
- Scroll to the Header Name and input ‘Content-Type” for the Header Name and set the Header Value to ‘application/x-www-form-urlencoded’
- Give the connection an appropriate name like ‘ServiceNow_OAuth_Grant‘
- Press Test Connection.
- You should see the following and can then press Close and then Save.

Run the connector to get your Token
Once you have saved your connector, running it is easy.
-
- Click Select data for your ServiceNow OAuth_Grant connector

2. Check the box for root
3. Notice that Qlik will automatically show you what the return data would be.

4. Press Insert script so that Qlik will actually build your load script for you.
5. Press Load data to then pass your client id and secret and have the values returned to a table
6. Press Preview so you can see what you are dealing with:

Look at that. I now have a table that contains the token that was created. It also shows the authorization scope(s) for security permissions in ServiceNow, and it even tells you what token_type it is (Bearer) which is important in a minute. The final thing it shows you is how long it is valid for.
Remember this is just the first step of the process. The token it created is simply the temporary access key that other REST connectors will use. So, you need to get that token value. Easiest way to do that, is simply create a straight table and add the access_token field to it. Then right click and choose Copy cell value.

If your security team does create that client with an expires in of a year or 10 years, you can simply save that access_token value to a file somewhere that is protected. For the next 10 years anytime you want to create a new Qlik Rest Connector with that token, you simply open your saved file and paste it in. Easy breasy.
But my security person (me) said “How about we go for 1800 seconds (30 minutes) instead. That provides ample time for me to now build the other Rest Connectors I need and pass in this bearer token as the security. You see had I made the value 10 seconds, by the time I copied it, and built even a single new rest connector I would be out of luck. By the time I pasted in the security it would already have expired.
Building a Rest Connector with a Bearer Token as security
1. Create a new data connection and choose REST as the source like we did for the for OAuth exchange one.
2. Insert the ServiceNow URL path you want. I have used the following dot-walk-thru notation for the table API in ServiceNow that will return incidents and the display values. Use one that you have been given by your ServiceNow team for the data they wish you to use, or use this one and simply fill in your tenant information:
https://<your tenant>.service-now.com/api/now/table/incident?sysparm_display_value=true&sysparm_query=category%3DVendor&sysparm_limit=1000&sysparm_fields=number,sys_id,short_description,description,close_notes,category,subcategory,incident_state,priority,urgency,impact,opened_at,resolved_at,closed_at,sys_created_on,sys_updated_on,close_code,active,made_sla,contact_type,reassignment_count,reopen_count,company.name,assigned_to.name,opened_by.name,resolved_by.name,caller_id.name,assignment_group.name

3. Keep Authentication set as Anonymous and scroll down to the Query headers section. Enter ‘Authorization‘ as the Name, and then ‘Bearer ‘ (you need a blank space after Bearer) followed by the token value into the Value parameter.

4. Give the new connection a name like ServiceNow Incidents Bearer or something.
5. Test the connection and press Create.
Extracting incidents with the new connector
1. Locate the new connector in your connections list and click Select data

2. Check the box for result and Qlik will then show you what will be returned. Then press Insert script.

3. After the dialog clears and your new load script code has been added, go ahead and press Load data.
4. The preview of your data will look something like this:

Pop Quiz
This is a tricky question, so think carefully before you answer.
Question: Your script now runs your OAuth connector to exchange your hard coded client credentials for a valid Bearer Token, then calls your Incidents connector to pull incidents. Which bearer token is your ServiceNow Incidents Bearer connection using?
Answer: The one that you copied from your first call. The one you displayed in a straight table and hand copied and hard coded into your Incidents authorization.
Who cares anyway. After all, you just read the incidents data. It’s not like this will need to run hourly/daily or on any scheduled basis.
Oh wait. Those pesky end user are going to want this data to be fresh. So, you set a schedule to run this in another X minutes/hours/days. Then you are promptly greeted with an alert that your reload failed. Guessing telling you that you should manually copy/paste it each time you run the OAuth connector is out of the question.

Converting the token into a variable
Do you like algorithms? I sure do, so I will assume you do as well.
At a high level what we need to do is take the most recently pulled token and keep it in a variable. Then we need to convert the hard coded token into one that uses the freshly issued one. So, let’s tackle those separately and begin with converting the new token you pulled into a variable:
// Capture the Token as a variable
LET vAccessToken = Peek(‘access_token’, 0, ‘root’);
We know that was easy. But feel free to take an early lunch and tell your boss that it took you hours.
The second part is nearly as easy, providing that you check one more box on your Service Incidents Bearer connection that is labeled ALLOW WITH CONNECTION. It was checked in my image above, but I didn’t call it out for you and your mind at that point was on entering the Query Header to pass the token.

The bigger picture for that checkbox is that it might not really make sense to you. After all it doesn’t say “All me to use a variable for my bearer token instead of using this hard coded value.”
It also doesn’t say “Allow me to override the URL that I gave you and use a new instead.”
I could give you a million other sets of text for what it doesn’t say, which is probably why Qlik’s internal team opted to simplify it to mean “allow me to pass you a connection block that has everything you need and I will likely override some of what I’ve hardcoded when building this connection.” Go ahead and edit your incidents connection and ensure you click that Allow “WITH CONNECTION” button and save the connection.
Now all you need to is replace the
FROM JSON(wrap off) “result”;
to be
FROM JSON (wrap off) “result”
WITH CONNECTION (
HTTPHEADER “Authorization” “Bearer $(vAccessToken)”
);
Go ahead and press Load data again, and retake your Pop Quiz.
This time the answer to your pop quiz, is the same as your answer to your security person … “Within Qlik I will get a new bearer token issued every single time I call the rest api to read Incidents, Changes, Problems etc.”
Now your enterprises Data House is protected. Qlik will always renew the credentials so if the authorization scope keeps changing it doesn’t matter. Qlik will only have access to the data rooms you allow it, for as long as the token is valid.
Security Bonus:
Question: If someone ends up taking a look at your Incident connection and they copy that bearer token is there any risk that they can also use it?
Answer: Only for as long as that first timeout. After that it’s just sitting there looking valid, but really being useless because it’s time validity expired.
With Connection Bonus
The point of the post has finished and you are good to go in getting the data you need so your boss stops yelling at you, and in a way that both you and your security person know full well is safe.
However, as I eluded to earlier … you can change the URL itself if the hardcoded value no longer suits your needs. So, consider this yet more bonus material. You can pass a URL on the fly like this:
WITH CONNECTION (
URL “https://venqlikda.service-now.com/api/now/table/incident?sysparm_display_value=true&sysparm_query=category%3DVendor&sysparm_limit=1000&sysparm_fields=number,sys_id,short_description,description,close_notes,category,subcategory,incident_state,priority,urgency,impact,opened_at,resolved_at,closed_at,sys_created_on,sys_updated_on,close_code,active,made_sla,contact_type,reassignment_count,reopen_count,company.name,assigned_to.name,opened_by.name,resolved_by.name,caller_id.name,assignment_group.name”,
HTTPHEADER “Authorization” “Bearer $(vAccessToken)”
);
Perhaps you want to ask for the incidents, but only the ones since the last time you pulled them. You know a Qlik Incremental Load. That would be cool, because you sure can’t hard code that when you build the connection the first time.

where you build that vIncidents_QueryEncoded variable ahead of time like this:
LET vIncidents_WatermarkDate = Date(vIncidents_Watermark, ‘YYYY-MM-DD’);
LET vIncidents_WatermarkTime = Time(vIncidents_Watermark, ‘HH:mm:ss’);
LET vIncidents_QueryEncoded = ‘sys_updated_on%3Ejavascript%3Ags.dateGenerate%28%27’ & vIncidents_WatermarkDate & ‘%27%2C%27’ & vIncidents_WatermarkTime & ‘%27%29’;