
Hungry Hungry Hippos

Background
I loved playing Hungry Hungry Hippos as a child, as a parent and as a grandparent. So when the opportunity arose to talk about Information Hungry hippos, I mean end users, I just couldn’t pass up the chance to use the game as a title.
In a previous post Taming the Trickiness of Temporality I walked you through a use case where products would go and off of sale. The solution to the problem was involved the super cool IntervalMatch function. At the time I told you it was one of my favorites, and I eluded to the fact that it could use used to solve other use cases as well like Staffing and Financial Accounting. In this post I’m going to about it’s relationship to staffing and the fact that when it comes to time and attendance information, end users can be like Informational Hungry Hippos in their requests.
Setting up the Use Case
While I’ve tried to add a little fun to the subject, the use case itself is very real. I’ve created this short video you should watch that sets up the use case before proceeding to get neck deep in the coding I will bring forth.
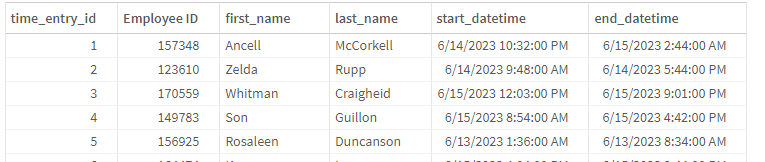
Now that you’ve watched the video and understand the use case, you can empathize with Ella Hippo. Poor thing is starting with nothing more than the companies Time and Attendance records. Very simple structured data that identifies the shift that each employee has clocked in and clocked out.
You can imagine how many information hungry hippos, I mean end users, like Haley, Hannah and Ivey Rose, ask for “reports” about who worked during certain time periods in a multitude of ways. Handling their needs in SQL/Reports as one of requests can be overwhelming.
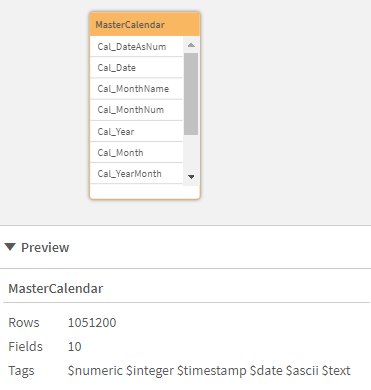
 Creating our Master Calendar for Every Minute of Every Day
Unfortunately my friend, you might be the Ella Hippo in your company. The good news is that through this post I’m going to walk you through creating the master calendar with time like you saw in the video. Once you understand how it works, then you  can simply download the zip file for it below, and make any adjustments you may need in your environment.
So let’s get started.
Building our calendar is going to be done in 3 steps. First we will build what is commonly referred to as a Master Calendar, containing only dates. Next we will build a Master Time table containing an entry for every minute of the day. Finally we will do the unthinkable and cause a Cartesian Join (don’t say that phrase out loud near your Database Administrators) so that we have a resulting Master Calendar for Dates that also includes every minute of the day.
Defining the Date Range for our Master Calendar
When I say we are creating a calendar, I mean it in the literal sense. Naturally you have a calendar on your phone, maybe on a planner on your desk, hanging on your refrigerator, but you don’t have one digitally that you can utilize within Qlik to associate to that Time and Attendance data so we will generate it. The first thing we need to do is define the range of dates we want for our calendar. In the code below I’m simply defining the range to be January 1, 2022 through December 31, 2023.
When building a calendar that we will store, which we will, it’s best to create the range that will cover all of the applications that may load it. But, if you are trying to create the calendar on the fly within your applications you could use the MIN and MAX dates in your data. Meaning, as in this case, if there are only employee time records for say March 12, 2023 – June 21, 2023, then we might as well only build those dates.
LET varMinDate = Num(MakeDate(2022,1,1));
LET varMaxDate = Num(MakeDate(2023,12,31));
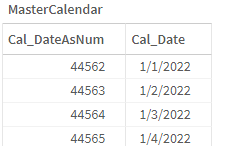
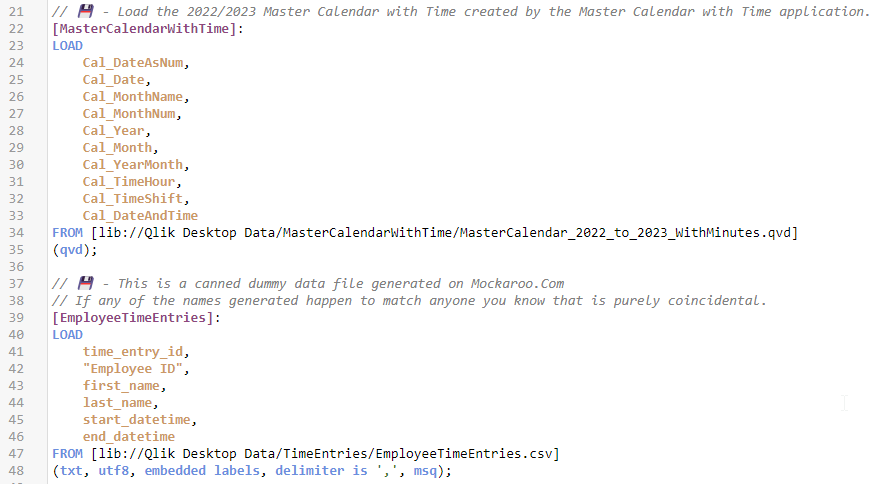
Step 1: Building the Master Calendar
Now let’s get to the cool coding stuff. What we want to do is create a date record for every single day between and including the min and max dates we identified in our variables. But how? Well that’s where the AUTOGENERATE keyword for the LOAD statement really comes in handy. It gives you the ability to execute something 1, 2, N times. Notice below I am using a comparison of the variables to tell it how many times to iterate.
MasterCalendar:
LOAD
$(varMinDate) + rowno() – 1 AS Cal_DateAsNum,
date($(varMinDate) + rowno() – 1) AS Cal_Date
AUTOGENERATE $(varMaxDate)-$(varMinDate)+1;
In the application attached you will notice I implemented it differently so you could see the flexibility. It combines the AUTOGENERATE with a While clause. In this case the While clause does the same thing, but you can use your imagination to realize quickly that the While clause could check other things besides just the iteration number. Thus, flexibility.
AUTOGENERATE 1
While $(varMinDate)+IterNo()-1 <= $(varMaxDate);
In the LOAD section we are simply creating 2 fields for our table. The first is Cal_DateAsNum which is simply a number, and the second is Cal_Date which is a Qlik Datetype field.
While the goal of this document isn’t to teach you how to build the world’s most thorough Master Calendar, plenty of posts online for that, I do want to take a second to share some additional code that you will see in the attachment application. Typically Master Calendars contain other ways that your end users will need when they look at a Date. They may want to know the Month for example. Or the Year. Or the {insert 100’s of other things that Information Hungry Hippos might want to see.}
This example simply does a few things to help you understand what those 100’s of other things may be, and guides you to considering the DUAL data type that is unique to Qlik just in case you aren’t already familiar with it. In our case we want to ensure that if the hippo on the other end builds a chart that uses the field Cal_Month they can see the month names in correct calendar order.
Left Join (MasterCalendar)
// Preceding load to create Dual values without having to do the original CPU work over
Load *,
Dual(Cal_MonthName, Cal_MonthNum) as Cal_Month,
Dual(Text(Cal_Year) & ‘-‘ & Cal_MonthName, (Cal_Year*100)+Cal_MonthNum) as Cal_YearMonth
// ➕ Add anything else you may want
;
Load *,
Month(Cal_Date) as Cal_MonthName,
Num(Month(Cal_Date)) as Cal_MonthNum,
Year(Cal_Date) as Cal_Year
// ➕ Add anything else you may want
Resident MasterCalendar;
[You can find an enlightening performance use for the DUAL function by reading my Qlik Community post entitled “You are invited to a DUAL.”]
Step 2: Building the Master Time table
While the calendar needed some variables to define the range, time is quite fixed. We know that there are exactly 1440 minutes in a day. In each day. In every day. That never changes. So, as you can see in the code we can simply tell our AUTOGENERATE clause to iterate 1440 times.
Above I utilized a PREDEDING load syntax and specifically called it out. But for this code I didn’t. Not because I’m lazy, heck I had to write about it here. I did it because 99% of the time as you evaluate other peoples code they won’t have comments so I wanted you to be able to recognize the concept. I’ve colored the preceding load text in red below. Similar to dates, we might want our Master Time to have other dimensional information about it like Hour, Minute, Shift etc. Again, you may have many more that your hippos, I mean, information starved end users, might want this was only a start for you.
Step 3: Joining Dates and Time
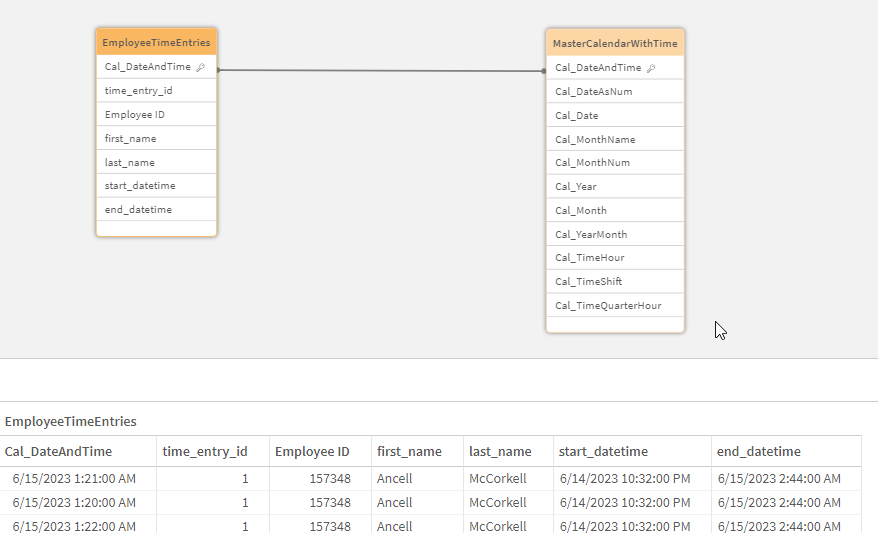
 Normally having no fields in common is a bad thing. “Oh no a CARTESIAN JOIN” your DBA would scream. However, in this case it’s exactly what we want. We want to create a row for every single minute in our Master Time table (1440) for every single date (730) in our Master Calendar. That’s what Cartesian Join will do, and Qlik handles that with no problem. So all we do is the normal Join to the Master Calendar from our Master Time table and we bring the Time and any other dimensional variations along with it.
Load
MasterTime as Time,
Hour as Cal_TimeHour,
Shift as Cal_TimeShift
resident MasterTime_Calendar;
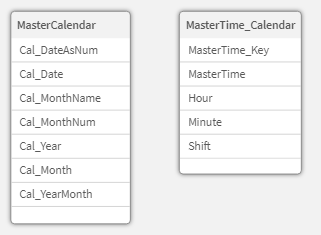
 If you clever, you will notice in the above image that there is no line showing an association to the Master Time table. That’s because as you will see in the attachment, I drop the time table as we would no longer need it.
Connecting our Master Calendar with Time and our Time and Attendance records
IntervalMatch to the rescue
Load start_datetime, end_datetime
Resident EmployeeTimeEntries;
Disclaimer:
Attachments
If you are looking to jump start your fun here are zip files for the each of the projects discussed in the video and the blog.
MasterCalendarWithTime IntervalMatchTime